
Red
Post 3
Occaecat aliqua consequat laborum ut ex aute aliqua culpa quis irure esse magna dolore quis. Proident fugiat labore eu laboris officia Lorem enim. Ipsum occaecat cillum ut tempor id sint aliqua incididunt nisi incididunt reprehenderit. Voluptate ad minim sint est aute aliquip esse occaecat tempor officia qui sunt. Aute ex ipsum id ut in est velit est laborum incididunt. Aliqua qui id do esse sunt eiusmod id deserunt eu nostrud aute sit ipsum. Deserunt esse cillum Lorem non magna adipisicing mollit amet consequat.
Account Settings
Account settings
On this area you can update your personal details and change the language of your control panel.

- Control panel language: Change the language of your control panel, this setting is independent from your store’s language. Sign out and login again after changing this setting.
- First name: Your first name. Does not show in your store page.
- Last name: Your last name. Does not show in your store page.
- Email: The email used for registration. This field is not editable.
- Password: A secure password of your choosing.
- Confirm password: Repeat your password
Account Settings
Account settings
On this area you can update your personal details and change the language of your dashboard.
- Name: Your name. Does not show in your store page.
- Email: The email used for registration. This email is used for all communications with Kiripp, including order notifications, customer inquiries, and other important information. It is also used for logging in to your control panel.
- Language: Change the language of your dashboard, this setting is independent from your store’s language.
- Change password: You can change your password here.
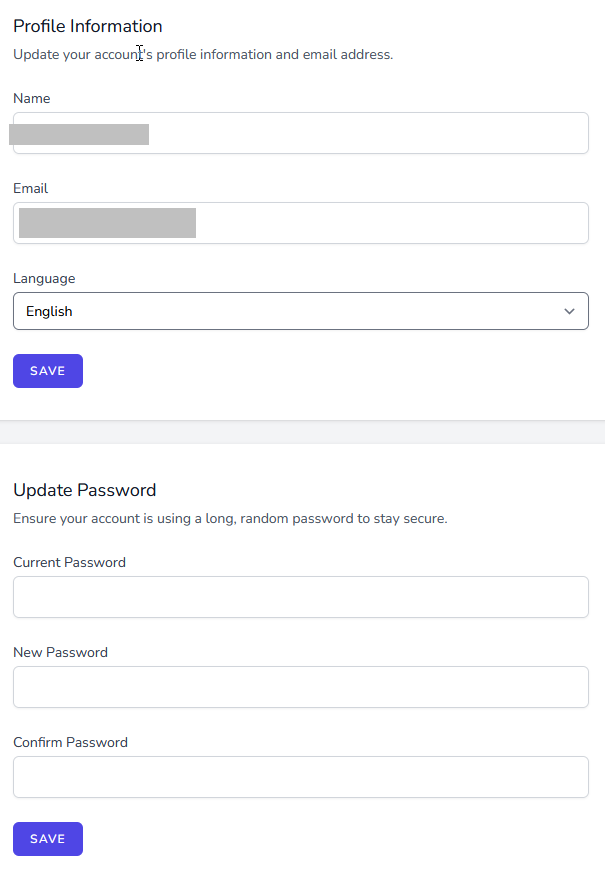
Admin Account Settings
Admin - Account settings
On this area you can update your personal details and change the language of your control panel.
- Control panel language: Change the language of your control panel, this setting is independent from your store’s language. Sign out and login again after changing this setting.
- First name: Your first name. Does not show in your store page.
- Last name: Your last name. Does not show in your store page.
- Email: The email used for registration. This field is not editable.
- Password: A secure password of your choosing.
- Confirm password: Repeat your password
Admin Accounts
Admin - Accounts
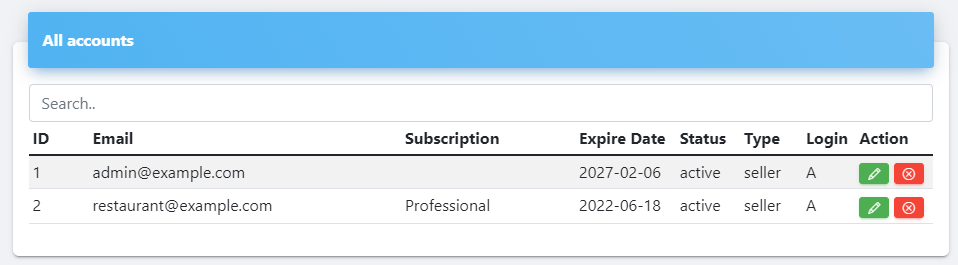
Accounts main page
In this area you can see all the accounts of your agency service, as well as edit and delete them (green and red buttons respectively).
- ID
- Email: The Email associated with the account.
- Subscription: Shows the account’s subscription if available.
- Expire date: Shows the account’s expiration date. Free trial accounts have an expiration date of 30 days after registration. Expired accounts are limited but not deleted. (user can log-in and purchase a subscription to continue using the service)
- Status Shows the account’s current status (active or expired)
- Type Shows the account type. Account types can be Seller, Buyer, or Admin
- Login Shows the account login status:
- A: Account is active
- S: Account has been suspended
- P: Account has a pending activation
Manually adding a seller account

Admin Dashboard
Admin - Dashboard
After the initial setup is completed, login to your service dashboard using the provided administrator account.
Example:
Info boxes
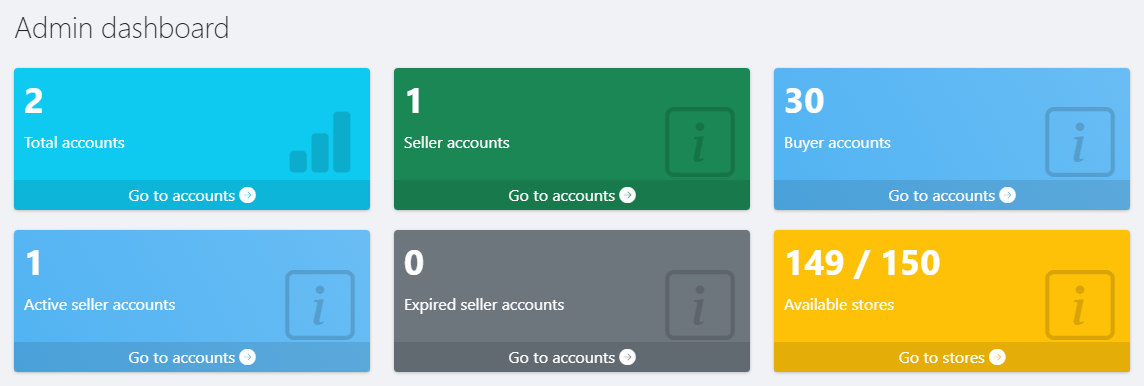
These boxes show your service statistics.
- Total accounts
- Seller accounts
- Buyer accounts
- Active seller accounts
- Expired seller accounts
- Available stores
Admin Settings
Admin - Settings
In this area you can view and change your service-wide settings.
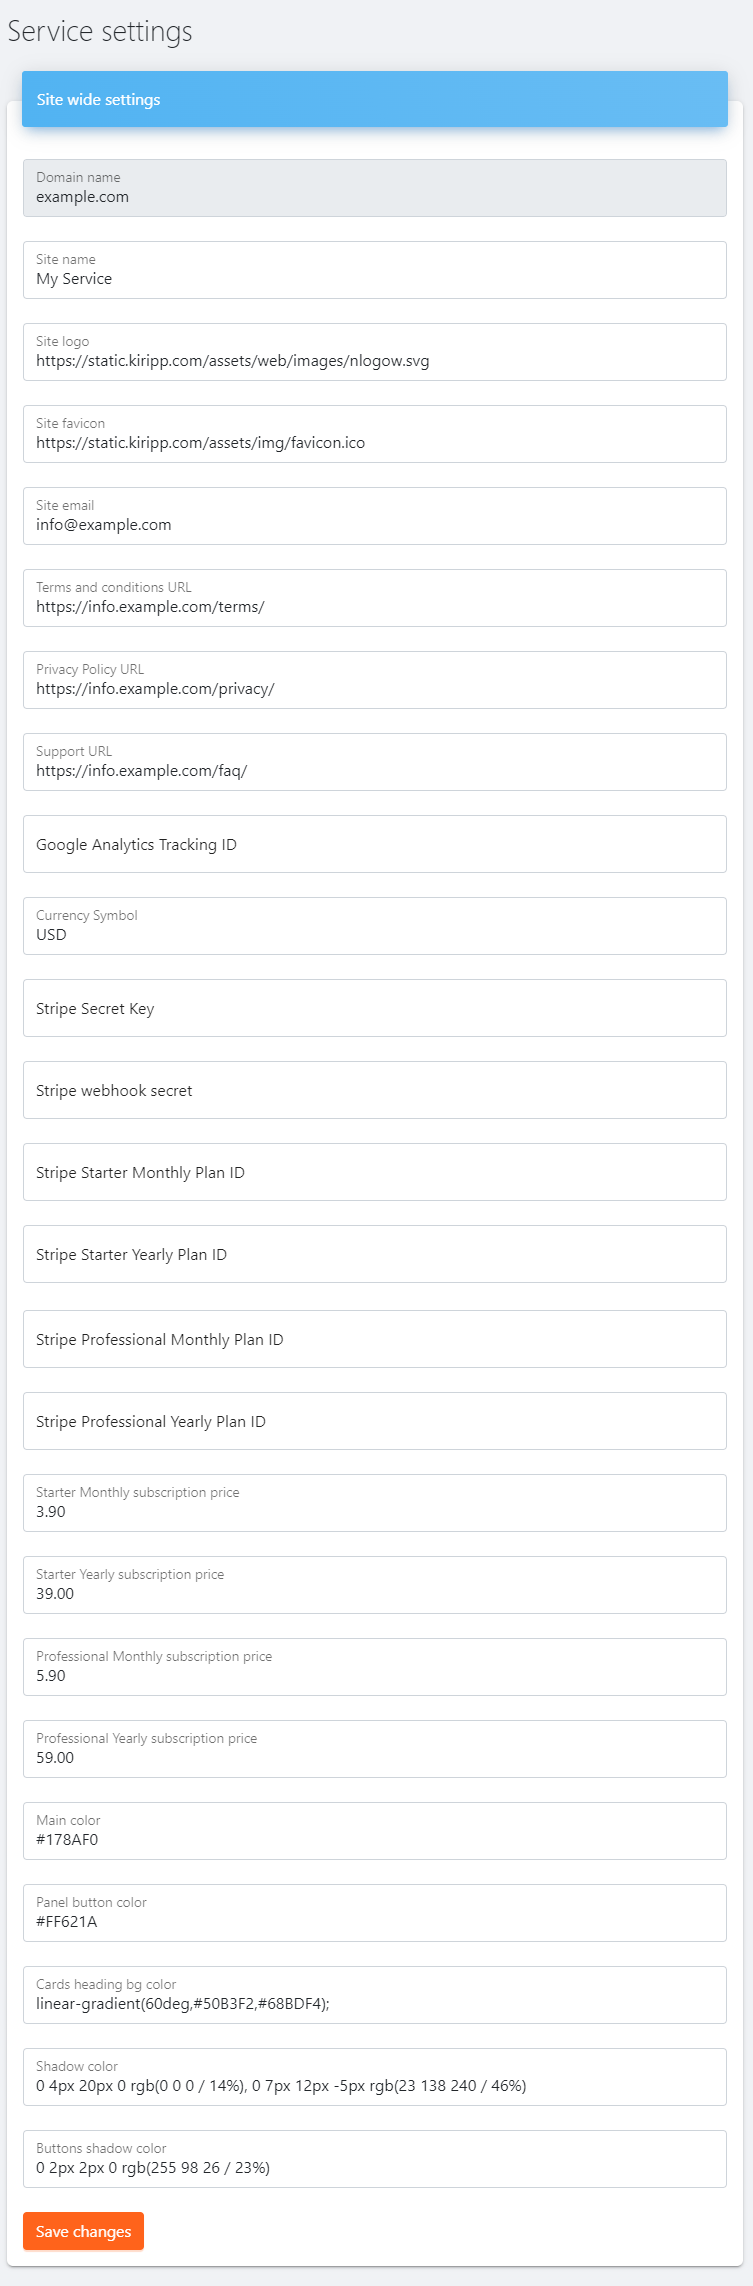
- Domain name: Shows the domain name of your service (not editable)
- Site name: Your service name shown in your service pages and stores
- Site logo: Your service logo. Shown in the control panel header, footer and registration/login pages
- Site favicon: Your service favicon
- Site email: Your customer support email. Shown in the footer area of your service pages.
- Terms and conditions URL: The URL of your Terms and conditions page.
- Privacy policy URL: The URL of your privacy policy page.
- Support URL: The URL of your support page.
- Google Analytics tracking ID: Your Google Analytics code. To track visitor statistics on all your service pages and stores.
- Currency symbol: The currency symbol for displaying your subscription plane (e.g. USD for American Dollars)
- Stripe secret key: Your Stripe secret key (see Stripe set-up for mode details)
- Stripe webhook secret: Your Stripe Webhook secret (see Stripe set-up for mode details)
- Stripe Starter monthly plan ID: Your stripe Starter subscription monthly plan ID (see Stripe set-up for mode details)
- Stripe Starter yearly plan ID: Your stripe Starter subscription yearly plan ID (see Stripe set-up for mode details)
- Stripe Professional monthly plan ID: Your stripe Professional subscription monthly plan ID (see Stripe set-up for mode details)
- Stripe Professional yearly plan ID: Your stripe Professional subscription yearly plan ID (see Stripe set-up for mode details)
- Starter monthly subscription price: Your Starter monthly subscription price
- Starter yearly subscription price: Your Starter yearly subscription price
- Professional monthly subscription price: Your Professional monthly subscription price
- Professional yearly subscription price: Your Professional yearly subscription price
- Main color: Your service main color (control panel header and footer color) Default value: #178AF0
- Panel button color: Control panel and registration pages button color Default value: #FF621A
- Cards heading bg color: Control panel headings background color (gradient) Default value: linear-gradient(60deg,#50B3F2,#68BDF4);
- Shadow color: Control panel header shadow color Default value: 0 4px 20px 0 rgb(0 0 0 / 14%), 0 7px 12px -5px rgb(23 138 240 / 46%)
- Buttons shadow color: Control panel buttons shadow color Default value: 0 2px 2px 0 rgb(255 98 26 / 23%)
Admin Stores
Admin - Stores
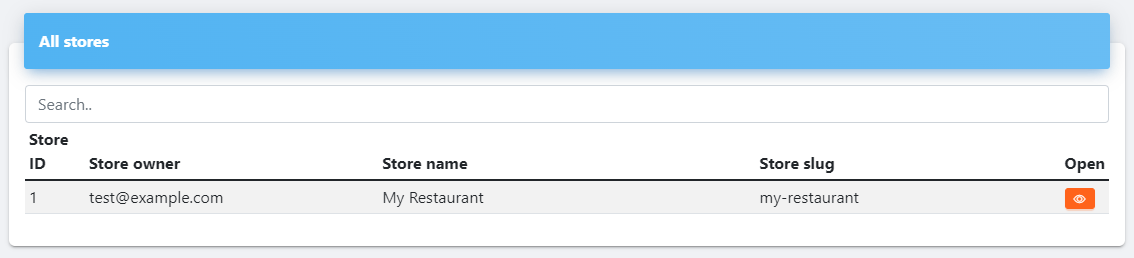
In this area you can see all the stores of your agency package. Open an individual store by clicking the Open store button.
- ID: The store’s ID
- Store owner: Shows the store owner’s email
- Store name: Shows the store’s name
- Store slug: Shows the store’s URL slug
- Open store button: Opens the store in a new tab
Admin Subscriptions
Admin - Subscriptions
Subscriptions main page
This page records Stripe’s webhook events. Refer to this page to monitor subscription and payment related events and match the payments received in your Stripe account in order to verify your configuration.
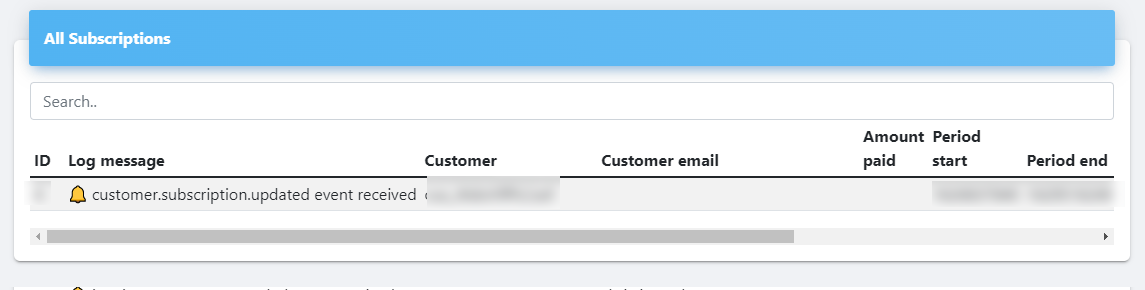
- Event ID
- Event’s log message: Shows the event type
- Customer: Shows stripe’s customer ID
- Customer email: Shows the account’s email address associated with the payment (this field does not show in in all events)
- Amount paid: Shows the amount paid in the transaction (this field does not show in in all events)
- Period start: Shows the active subscription’s starting period
- Period end: Shows the active subscription’s ending period
- Created: Shows the subscription’s creation date
- Subscription: Shows stripe’s subscription ID
- View event details button Click to open the event’s details
- Delete event Click to delete record
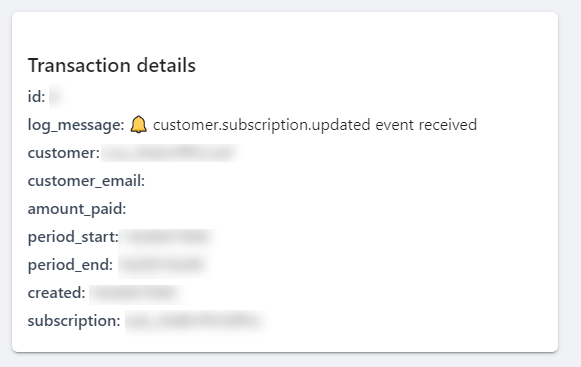
View event details
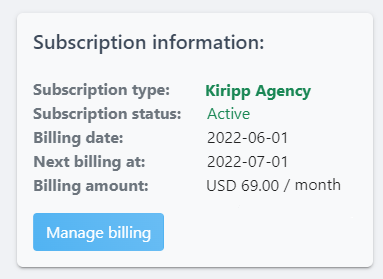
Agency Billing
Agency billing page
In this area you see your subscription details, purchase a new subscription on expired plans, as well as update your billing details.
Agency billing information (on active subscriptions)
Agency Plan Information
Agency plan information
With our Agency plan, we offer a white label service for agencies and partners. With this service, you can offer a Kiripp-like solution under your own brand and domain, managing your own users.
Agency Setup
Initial set-up for agencies
Here are the first steps for creating your own service.
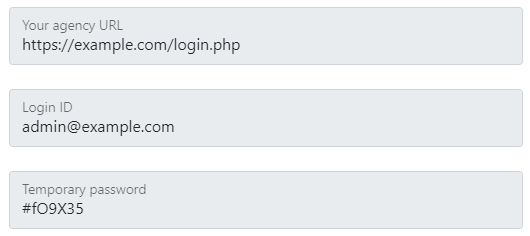
Signup
Sign up and subscribe to our Agency plan in the agency signup page.
Once you login, you will be greeted with the agency dashboard.
Initial setup
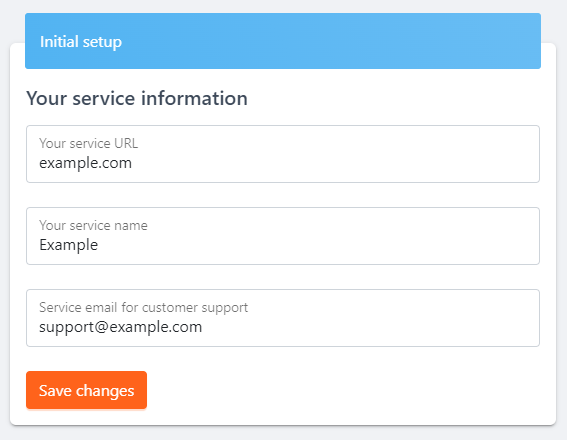
- Your service URL field. Enter your domain or subdomain you want to use for your service. For example:
- If the domain example.com is entered, your service pages will be:
- example.com/login.php (for user logins)
- example.com/signup.php (for user signups)
- example.com/store (for user stores)
- If the domain app.example.com is entered, your service pages will be:
- app.example.com/login.php (for user logins)
- app.example.com/signup.php (for user signups)
- app.example.com/store (for user stores)
- If the domain example.com is entered, your service pages will be:
- Your service name: This field is for providing the name of your brand for the initial setup (Example: Kiripp). It shows in the footer of the customer pages. This name can be changed after the initial set up from within your admin dashboard.
- Service email for customer support This field is for the email address for customer support purposes. It shows in the footer of the customer pages. This field can be changed after the initial set up from within your admin dashboard.
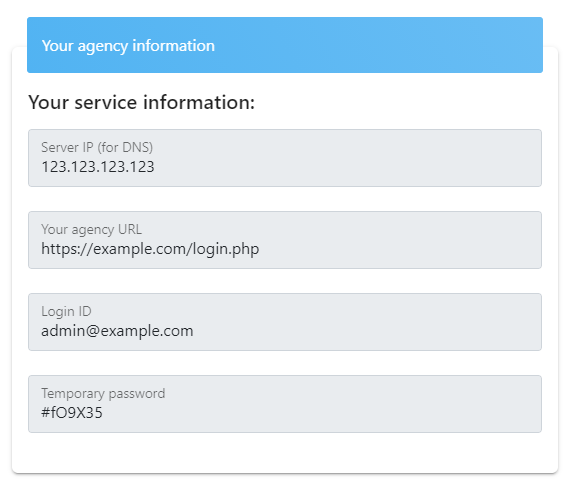
Agency information
Agency Stripe Setup
Stripe set-up
In order to receive subscription payments you need a Stripe account. Follow the steps below to integrate it with your service:
- Register or login to your Stripe dashboard
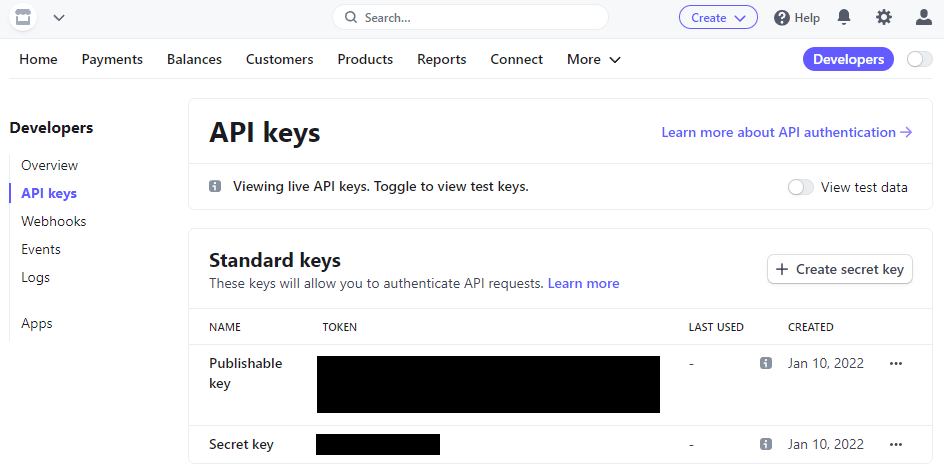
- Generate your Stripe secret key:
-
Go to Developers > API Keys

-
Click the Create secret key button and give it a name
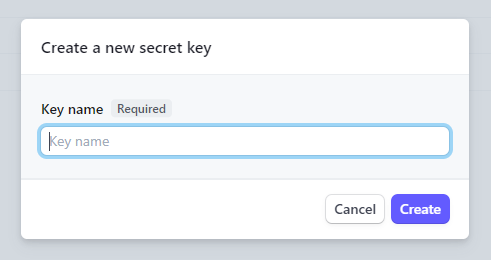
-
Copy the generated key and store it in a secure location
-
Paste your Stripe secret key in the corresponding field of your service settings page
Billing
Billing page
In this area you see your subscription details, purchase a new subscription on expired plans, as well as update your billing details.
All subscription payments are processed directly and securely by Stripe. We do not process or store any credit card information.
Categories
Categories
On this page you can manage your store’s categories.
When setting up your store, add your product categories before adding your individual products.Product and categories must have a unique name.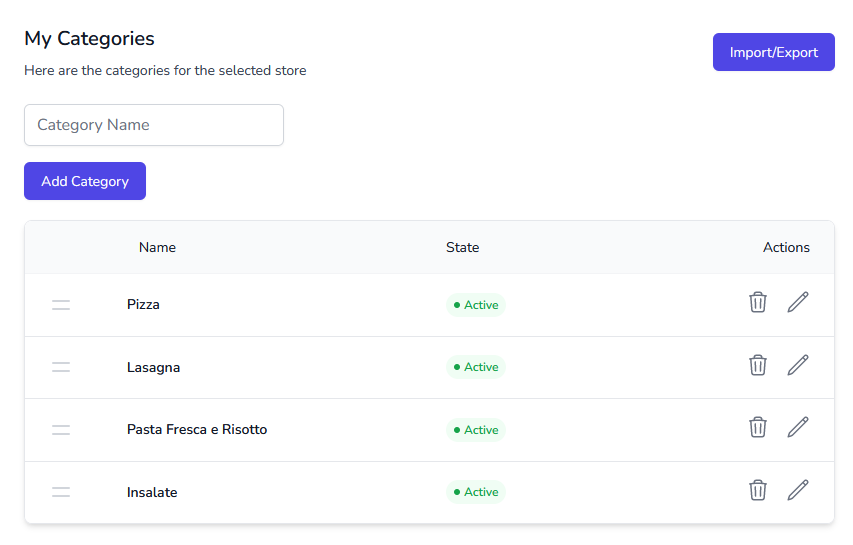
Changelog
What’s new
2026-02-23
Store themes improvements and bug fixesImproved checkout ui for theme consistency
2026-02-14
NEW: Theme 7Improved store options pageRefactored all themes and checkout pageJs store improvements (all themes)Enforced https in store assetsVarious security improvementsTheme 2 improvementsPayments flow improvements: Customer facing confirmation after payment finalizationCheckout form fixesRefactored checkout order/stock flow to transactional + payment-confirmed state transitions
2026-02-04
Improved security in admin paymentsImproved customer payment flow across all payment providersPayPal bug fixesVariation bug fixesImport refactor to improve validation and uximport to validate-first and UXRefactored checkout order/stock flow to transactional + payment-confirmed state transitions
2025-12-24
NEW: Added sub-categoriesSubscription fixesPayment providers updates
Create a store
Create a store
To get started, go to the Kiripp dashboard and log in.
Create a new store
Click on the Create a new store button in the My Stores section.
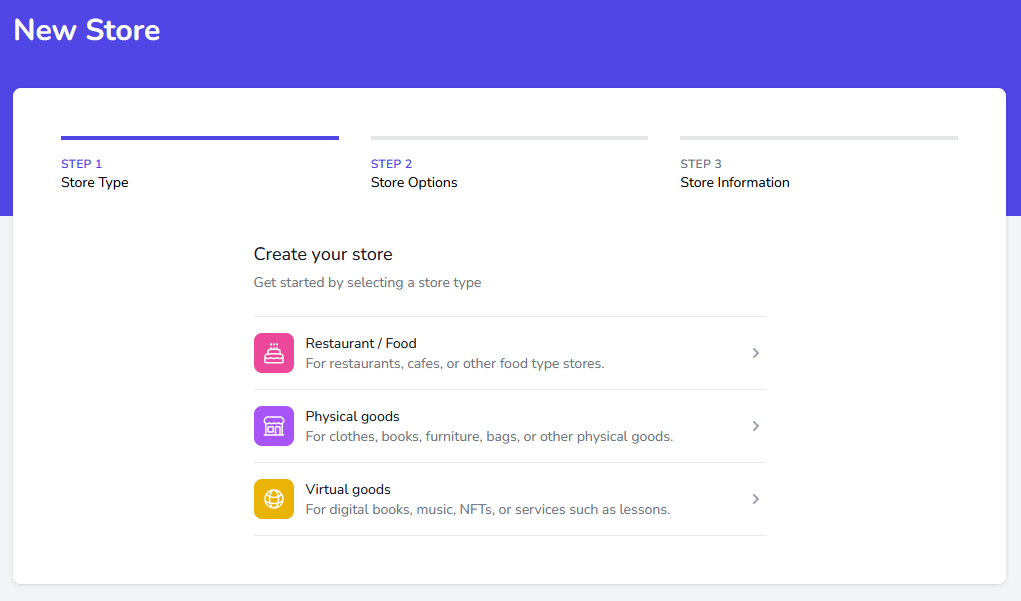
Select the type of store you want to create:
- Restaurant/Food: Select this option if you want to create a store for a restaurant or food delivery service.
- Physical goods: Select this option if you want to create a store for physical goods, e.g. clothing, electronics, etc.
- Virtual goods: Select this option if you want to create a store for virtual goods, e.g. software, e-books, etc.
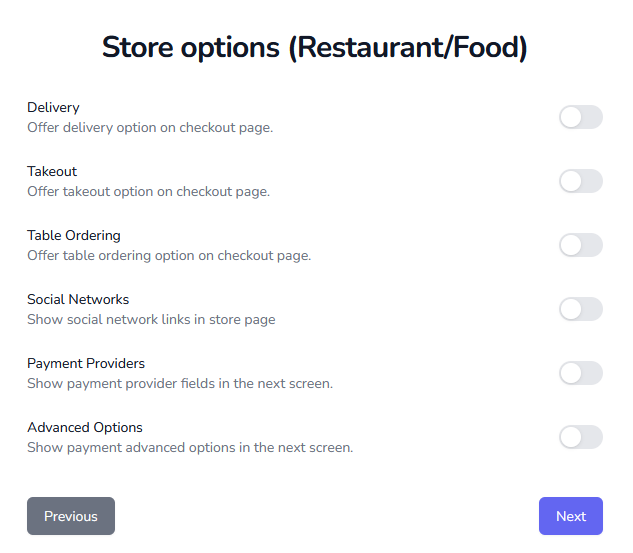
The store changes according to the type you select. For example, if you select Restaurant/Food, you will have options for table ordering, delivery options, etc.Store options (Restaurant/Food)
Custom Domain SSL
SSL on custom domain
The steps on this page are not required for custom domains (CNAME) to work.For enabling SSL with your custom domain, we recommend using Cloudflare.
Customers
Customers
In this area you can view a list of your customers and their orders.
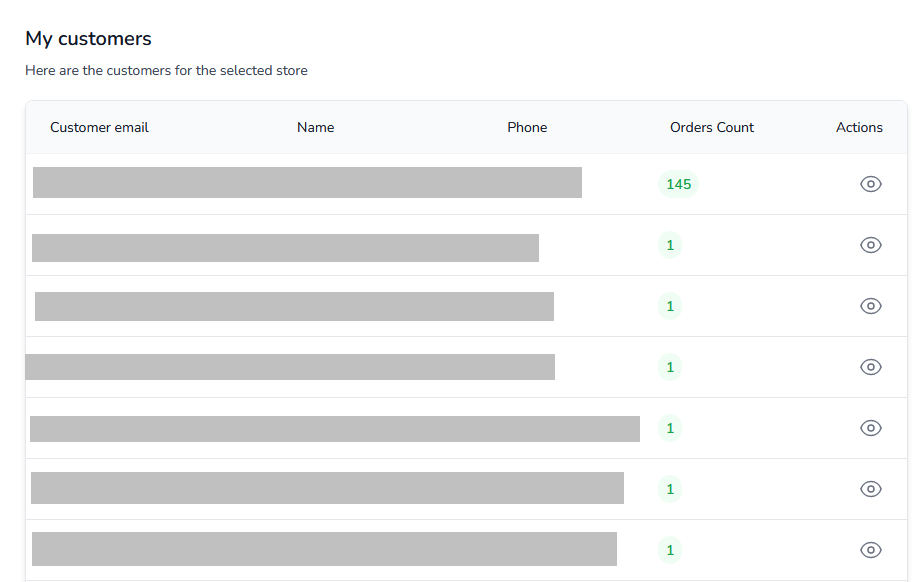
In this area you can view a list of your customers and their registration date, email and number of orders made. View a customer details by clicking on the View details button.
Customer details

In this area you can view any of your customer’s order history. You can open any of the orders by clicking on the View button.
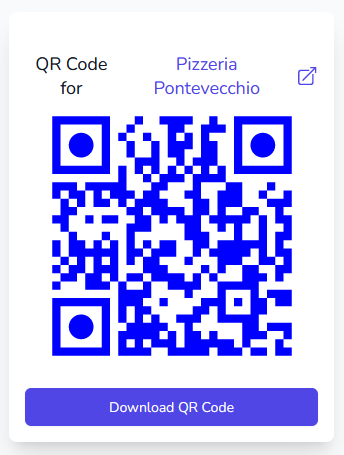
Dashboard
Dashboard
On this area you get an overview of your currently selected store. It shows the number of products, categories and orders, as well as your store’s unique URL and QR Code, and also your subscription information.
Info boxes
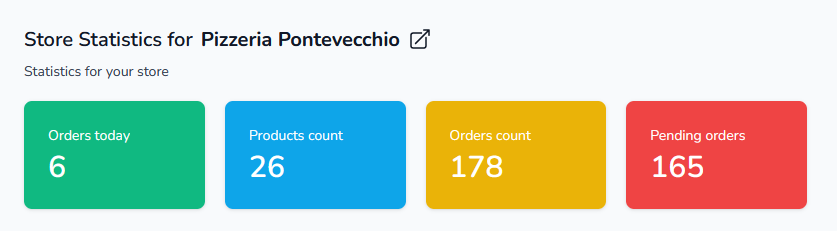
These boxes show the number of products and categories in your store, as well as the total number of orders and the number of orders with “Pending” status.
Store URL and QR Code
FAQ
Frequently Asked Questions
-
What is Kiripp?
Kiripp it a tool for helping small businesses to digitally showcase and sell food or products in as easy, fast and streamlined way. It automates sales and payments without app installs, intermediaries or comissions. -
How do i receive payments from my customers?
Kiripp allows you to receive payments directly from your customers during the checkout process. It integrates: PayPal, Mercado Pago and Stripe. -
Does this service only works with WhatsApp?
WhatsApp is only one of several modes available for selling your products or food. You can also choose between SMS, Email, or PayPal, Stripe, and Mercado Pago modes (if you wish to receive payments during the checkout process). Only in WhatsApp mode, WhatsApp is used as part of the ordering workflow.Mercado Pago Setup
Mercado Pago Setup
Information
To start accepting payments with Mercado Pago with your Kiripp store you need to create an app and obtain its Credentials.
Create a Mercado Pago Account
Sign Up for a Mercado Pago account here. If you already have an Account, skip this step.
Create an app and get its credentials
Go to your Mercado Pago Developer panel here and create a new application.
Merchant Feed
Merchand Feed
coming soon
Migrating from Kiripp V1
Migrating from Kiripp V1
Information
If you are migrating from Kiripp V1, you can follow these steps to migrate your store to the new version.
You can only migrate your products from Kiripp V1 to Kiripp V2. Your store settings and other configurations will not be migrated and you will need to set them up again.Migrate your store
Go to your Kiripp V1 dashboard and log in.
Orders
Orders
My orders
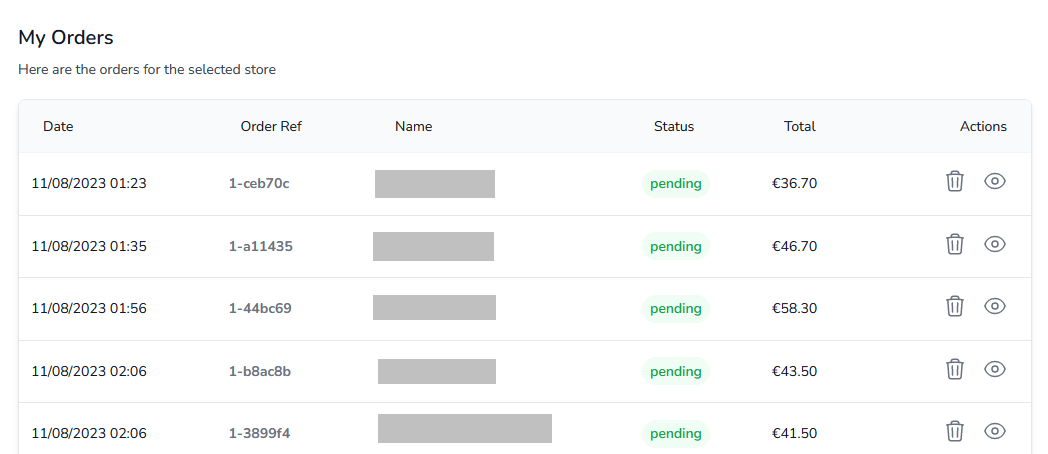
In this area you can view your current orders and delete them.
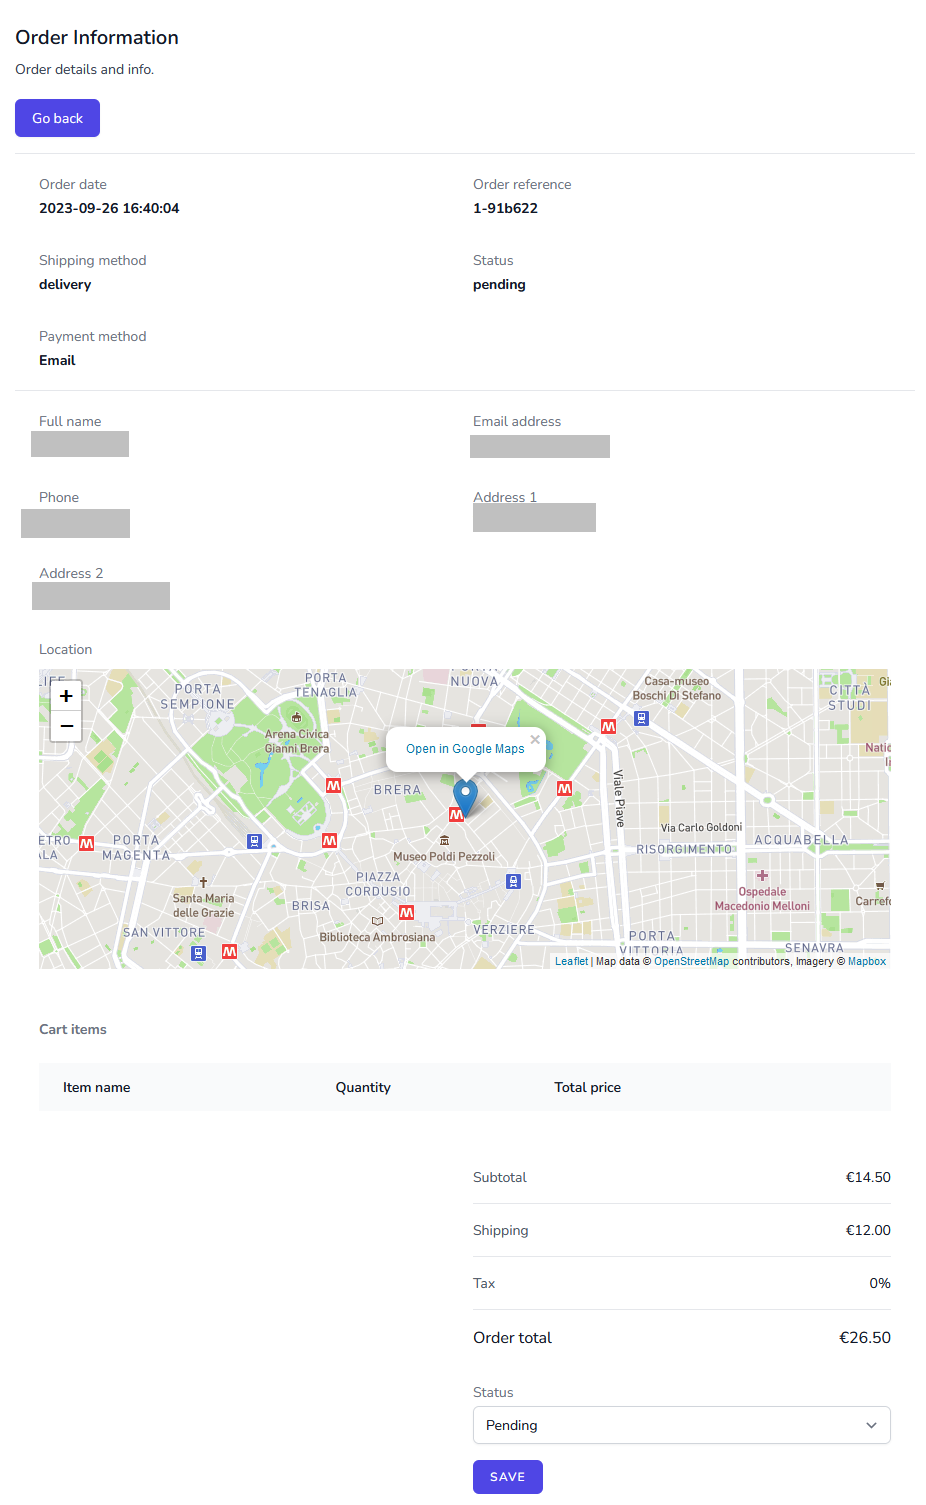
Orders get recorded in this area on all checkout modes (e.g. WhatsApp, SMS, Email, Stripe, Paypal, Mercado Pago).View order
Payments
Payments
View all payments
Here all payments made on PayPal, Stripe and Mercado Pago modes get recorded. Use this information to match the payments with your payment provider in order to verify your initial payment provider configuration. For this purpose it is recommended to make a test purchase after the initial set up is completed.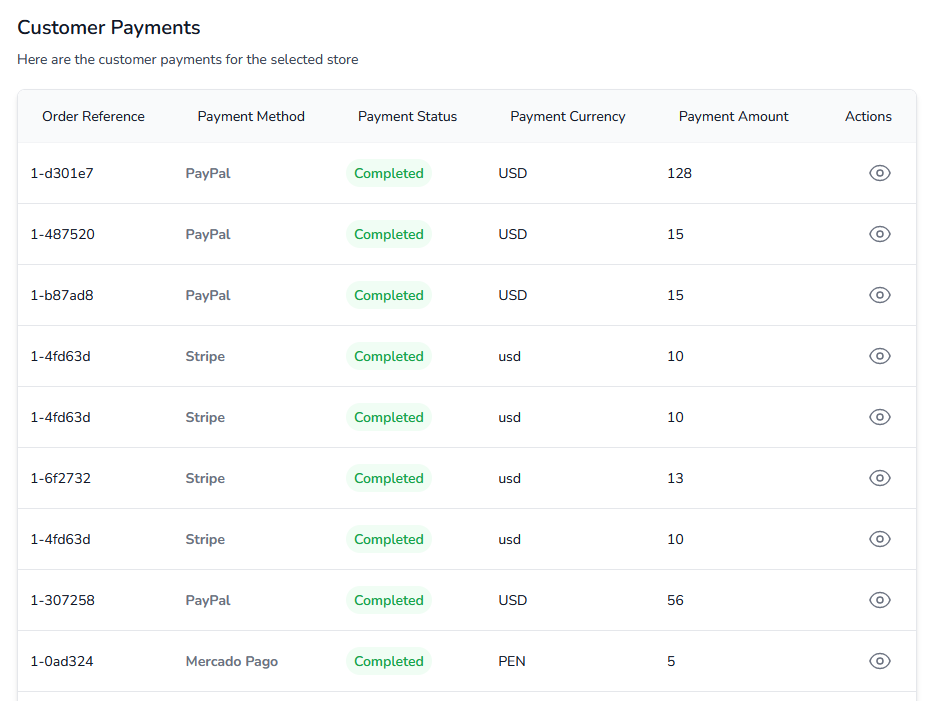
PayPal Setup
PayPal Setup
Information
To start accepting payments with Paypal with your Kiripp store you need to obtain Paypal API keys.
To be able to create API keys you will need to make sure your PayPal account is a Business account and not a Personal account. This is required for creating working API Keys for your store.
Create a PayPal Business Account
Sign Up for a business account here. You can find additional instructions for opening a Business account here. If you already have a Business Account, skip this step.
Post 2
Anim eiusmod irure incididunt sint cupidatat. Incididunt irure irure irure nisi ipsum do ut quis fugiat consectetur proident cupidatat incididunt cillum. Dolore voluptate occaecat qui mollit laborum ullamco et. Ipsum laboris officia anim laboris culpa eiusmod ex magna ex cupidatat anim ipsum aute. Mollit aliquip occaecat qui sunt velit ut cupidatat reprehenderit enim sunt laborum. Velit veniam in officia nulla adipisicing ut duis officia.
Exercitation voluptate irure in irure tempor mollit Lorem nostrud ad officia. Velit id fugiat occaecat do tempor. Sit officia Lorem aliquip eu deserunt consectetur. Aute proident deserunt in nulla aliquip dolore ipsum Lorem ut cupidatat consectetur sit sint laborum. Esse cupidatat sit sint sunt tempor exercitation deserunt. Labore dolor duis laborum est do nisi ut veniam dolor et nostrud nostrud.
Privacy Policy
Privacy policy
Kiripp.com operates the kiripp.com website, which provides the SERVICE.
This page is used to inform website visitors regarding our policies with the collection, use, and disclosure of Personal Information if anyone decided to use our Service, the kiripp.com website.
If you choose to use our Service, then you agree to the collection and use of information in relation with this policy. The Personal Information that we collect are used for providing and improving the Service. We will not use or share your information with anyone except as described in this Privacy Policy.
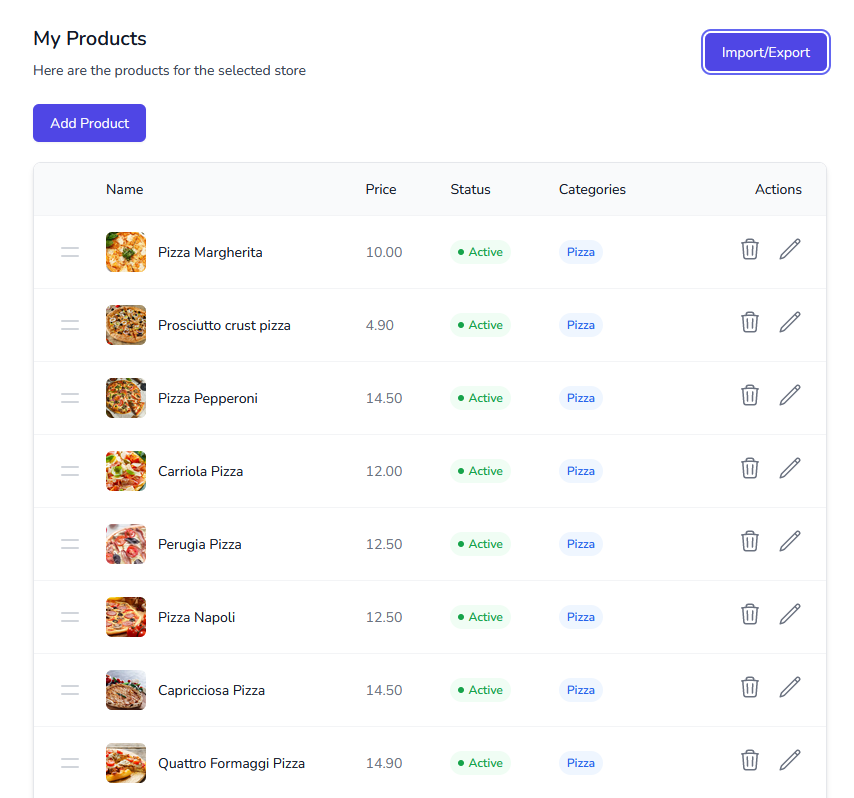
Products
Products page
On this page you can manage your store’s products. It allows to add your products manually or in bulk via CSV file import.
When setting up your store, add your product categories before adding your individual products.Product and categories must have a unique name.Products table
Quickstart
Quick start
The information in this section is out of date. We are working to update it as soon as possible.Kiripp stores are easy to use on any device and don’t require any installation.
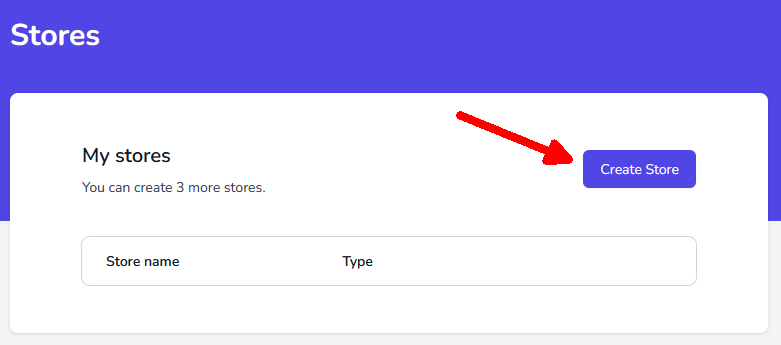
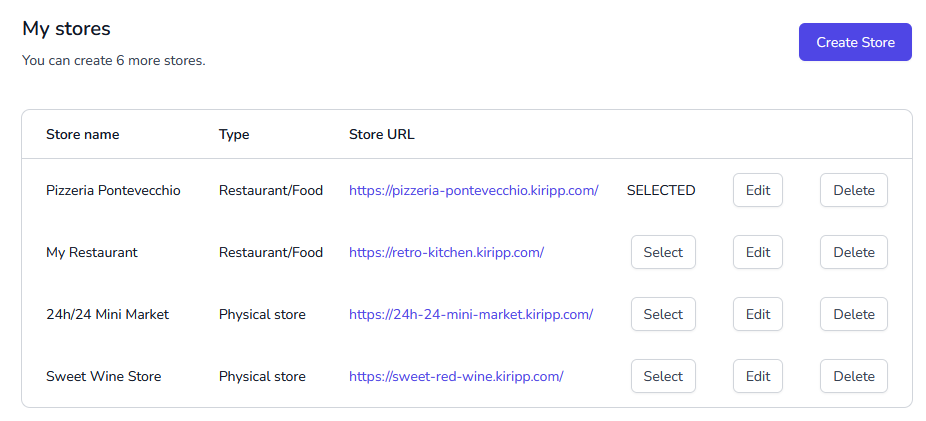
Stores
My stores
In this section you can create and manage your stores. You can create different types of stores such as restaurant/food, physical goods, and virtual goods.
To see your store related information, as well as adding products and categories, you must first select a store from the list.
 To view any of your store’s orders, you must first select the store from the list! If no store is selected, the orders section will be unavailable.
- Create store: Click on the Create store button to create a new store.
- Store name: The name of your store.
- Store type: The type of the store. (e.g. Restaurant/Food, Physical store, Virtual store.)
- Store URL: The URL of your store. Click on the URL to open your store in a new tab.
- Select button: Click on the Select button to select the store. Once selected, you can view the store’s information, add products and categories, and view orders.
- Edit button: Click on the Edit button to edit the store’s information.
You can change your store type after creation by editing the store.- Delete button: Click on the Delete button to delete the store. This action is irreversible and will delete all the store’s information, products, categories, and orders.
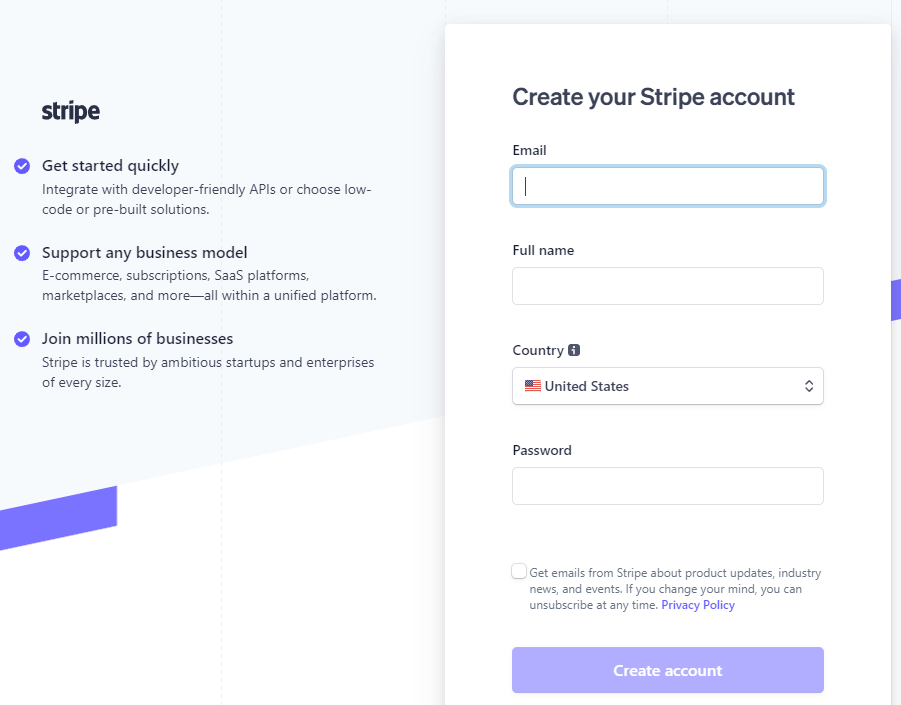
Stripe Setup
Stripe Setup
Information
To start accepting payments with Stripe with your Kiripp store you need to obtain its Developer API keys.
Create your Stripe account
Sign Up for a Stripe account here. If you already have an Account, skip this step.
Get your API keys
Go to Developer > API keys to obtain your Secret key.
Set up Webhooks
In order for Kiripp to get information about your customer’s payments, you need to configure Webhooks.
Terms of Use
Terms of use
The general Terms and Conditions detailed below govern the contractual relationship between the ‘User’ (hereafter also referred to as ‘You’ or the ‘Customer’) and Kiripp.com.
Both parties accept these Conditions unreservedly. These general Conditions are the only conditions that are applicable and replace all other conditions, except in the case of express. written, prior dispensation.Changes to the Terms of Service and the Website
Kiripp.com is a work in progress, and as such things may change, be added or be taken away. We reserve the right to update the Website and these Terms of Service from time to time, at our discretion and without any notice. It is solely your responsibility to keep up-to-date with the latest Terms and Conditions by checking back regularly.
Your continued use of the Website following the publishing of updated Terms of Service will be taken to mean that you have read and agree to the changes.Post 1
Title 2
Tempor proident minim aliquip reprehenderit dolor et ad anim Lorem duis sint eiusmod. Labore ut ea duis dolor. Incididunt consectetur proident qui occaecat incididunt do nisi Lorem. Tempor do laborum elit laboris excepteur eiusmod do. Eiusmod nisi excepteur ut amet pariatur adipisicing Lorem.
Title 2
Occaecat nulla excepteur dolore excepteur duis eiusmod ullamco officia anim in voluptate ea occaecat officia. Cillum sint esse velit ea officia minim fugiat. Elit ea esse id aliquip pariatur cupidatat id duis minim incididunt ea ea. Anim ut duis sunt nisi. Culpa cillum sit voluptate voluptate eiusmod dolor. Enim nisi Lorem ipsum irure est excepteur voluptate eu in enim nisi. Nostrud ipsum Lorem anim sint labore consequat do.
-